Mike Walsted's Miata's Bosectomy
This page is here to document what I did during the removal of the Bose system from my Miata. I made mistakes, and hopefully others will learn from this and not repeat those mistakes.
The Bose stereo in my Miata sounded less than awesome. The 9-year-old head unit was barely able to read CDRs and skipped at every opportunity, The AM radio section would occasionally go out, I no longer needed a cassette player, and the sound reproduction left a lot to be desired, although adding 2-inch extended-range speakers in place of the stock tweeters made a big difference.
In light of these deficiencies, I made the decision to upgrade the whole system. Based on my needs, I decided on getting a Kenwood Excelon KDC-X891 head unit, which I ordered from Locust Audio off of a popular auction and sales site. While waiting for the stereo to arrive, I looked for the wiring harness and dash kit. I ended up buying a Scosche wiring harness, a wallet holder from a local salvage yard, and a bunch of screws and brackets from Home Depot, as well as heat shrink tubing.
The stereo arrived late on a Wednesday morning, and I immediately began the swap. My first inclination was to install the head unit, and leave the Bose speakers in place for the time being. The Kenwood KDC-x891 has a volume offset function that would allow this to work properly. I connected the Kewood harness to the Scosche harness, wired the front RCA outputs to the front speaker wires on the Scosche harness, powered everthing up, and NO SOUND.
I rewired the speaker outputs to the Kenwood speaker outputs, powered everthing up, NO SOUND.
I disconnected the Scosche harness from the car, tried the original stereo to verify I didn't blow a fuse, plenty of sound. Verified polarity of the amp inputs, tried the Kenwood again, NO SOUND.
Tried the Kenwood using one of the Jensen's I had from a previous car, plenty of sound. It was time to pick up my daughter, so I put the original unit back in the car, and picked my daughter up from school.
When I got home, I re-examined the harness, and noticed that there was a wire on the car side of the harness that was not used. Looking at a wiring diagram, I realized that this wire triggered the relay that provided power to the amplifiers driving the Bose speakers. There was no wire on the scosche harness at that point, so I moved one of the unused wires over to that spot. I looked at the Kenwood harness, saw a tag that said External Control, and wired that to the Scosche harness to drive the amplifier power.
Once again, I hooked everything up using the preouts, NO SOUND.
Tried it using the speaker output, NO SOUND.
Tried the stock stereo, plenty of sound.
At this point I decided that it was time to just bypass the amps and use the Jensen JPS368 speakers I had in my garage. These speakers are not very good speakers, but were better than no sound at all. At this point, I decided that it would also be a good time to re-wire the system for a four-channel set-up, using the 2-inch speakers on the rear channel, and the Jensens on the front channel. That way, when I received the speakers to replace the Jensens, no re-wiring was needed.
I estimated that I would need about six feet of wire for each speaker. I cut two sections of six feet, and put quick-disconnects appropriate for the speakers on the ends. I then realized I only had a little more than ten feet left, and cut that section in half to use for the smaller speakers.
I removed the driver's door panel, and the 2-inch speaker, so that it the previous connection could be de-soldered and the new connection could be soldered. Around this time, I wished I had previously bought the Peerless 830970 2-inch Full Range Spearkers (or even better, if Madisound had them in stock back then, the Peerless 830983 2-inch Full Range Speakers,) instead of the Aurasound speakers, as the Peerless speakers have quick disconnects and would not have required de-soldering and resoldering. I now know that the Peerless are a bit too deep, and aren't as easy to install as the Aurasounds. Aurasound now has tabbed speakers, so soldering is no longer needed. After soldering the wire to the speaker, I removed the Bose speaker from the door to trial fit the Jensen to see what kind of adapter I would need to cut. The Jensen speaker fit in a vertical orientation, but not a horizontal orientation, leading me to believe that the hole in the door is not perfectly circular. Seeing that the two end holes on the Jensen speaker lined up with two of the holes already in the door led me to believe that the Jensen installation would be relatively easy, as no adapter would be needed if I was satisfied with only two screws holding the speaker.
Here is the Jensen installed on the driver's side:

With the small speaker soldered and the connectors on the wiring for the large speaker, it was time to run the wires. The hardest part was running the wires from the doors to the chassis. The door electrical wiring connects to the chassis via a quick disconnect.
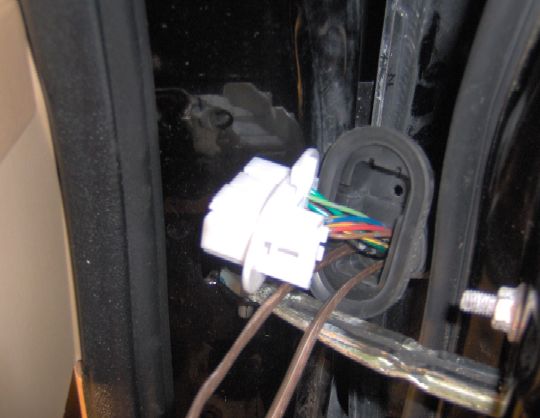
Here is the view between the door and the chassis on the driver's side:

Here is the view from inside the car:

To run the wiring without drilling new holes or repinning the disconnects with parts I didn't have, I needed to get the wire through that disconnect. At the top of the disconnect (on 1999 models) is a green locking plug. Removing the locking plug from the door side of the connector allows the wires to pass through that area, and also allows the three holes shown at the top of the interior view to be used for passing the wires on the chassis side of the connector. (Later years use a different method of locking the connectors.) Passing the wires through these holes is not an easy task, and really made me wish I was using a smaller gauge of wire. Once the wires for the driver's side were passed through both sides of the connector, the connector re-connected, and slack removed from the wires, the speakers were installed in place and the door panel replaced.
Here is a picture of the passenger side door connector prior to the wires being threaded through the door side of the connnector:
The wires were threaded through the dash and soldered to the Kenwood harness. Due to the shorter wires on the smaller speakers, there was not a lot of extra room for soldering, so it was done under the dash. During the soldering, I noticed that the Kenwood Harness had another unused wire marked POWER CONTROL, and I realized at that point, that if I had used that wire instead of the EXTERNAL CONTROL wire, I may have been able to use the Bose speakers and postpone the speaker rewiring to a time when I had the new door speakers I had planned on buying.
Passing the wires through the passenger side of the door presented a little more difficulty, as the heater blower is blocking most of the access to the interior portion of the quick disconnect. Some coat hanger wire with a small hook on one end was very valuable when passing wires through this part of the connector.
Here is how the system looks installed:
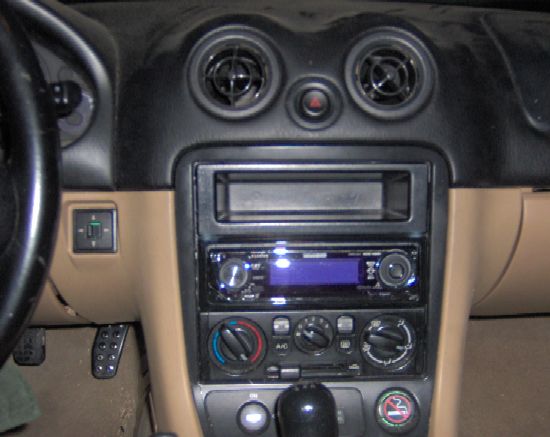
View of KDC-x891 installed. (Picture taken at night)


View of KDC-x891 installed. (Picture taken with the top down in sunlight, with faceplate sleeve in bin)

View of KDC-x891 installed without its faceplate. (Picture taken with the top down in sunlight

Picture of passenger side bracing. The strap is bolted to a bracket in the car and the head unit.
Once all of the speakers were hooked up, the stereo was tested, and the sound is a great improvement over the Bose system. An auxillary extension was plugged into the back of the unit, and a USB extension was plugged into the USB connector. Both of these wires were routed under the center console, and then into the center console through the opening for the trunk and gas cap levers. The system was then fastened into the lower din slot (using the provided sleeve and the bolts and brackets from Home Depot,) with the wallet holder in the upper din slot, finishing the installation around 10pm local time. A quick test drive showed that my power locks and power windows no longer worked, which turned out to be due to my forgetting to reconnect the quick-disconnects between the doors and chassis. Reconnecting these fixed that problem.
The improvement in sound quality and useability is very noticeable. The sound is clearer, stereo separation is much more defined, and the sound does not deteriorate when it is near freezing. Bass was noticeably lacking, (even more so with the top down,) with the Jensens, but this was expected given that used Jensen JPS368 speakers (which aren't that expensive to begin with,) were initially installed instead of something better. Since then, Lanzar VX830 speakers have been installed, and the sound is even better. These speakers are a direct fit for the 1999 Miata with the Bose system, so they install easily and are a decent value for the money if purchased for significantly less than their MSRP. One drawback is significant noise becomes apparent when the 50 watts-per-channel-maximum stereo is turned up to near maximum volume and bass for some bass-intensive music, which probably comes from the door panels instead of the speakers themselves.

The Lanzar VX830 installed.
I have transferred more than a couple of dozen of my CDs to a 16GB flash drive in .WAV format, and listening to them is quite enjoyable. Since the flash drive has no moving parts, bumps, braking, turning, and accelleration no longer cause skips. The only downside is that the system will not display artist and track information when playing .WAV files unless the folder and filenames match the artist and track names, respectively, although it will do so automatically for MP3 and other compressed files. The system has many ways to adjust sound output, summarized in the 56 page manual that came with the stereo, and many other features as well. The stereo's adjustability and my chosen combination of speakers has allowed me to tailor the sound to my liking, and I am very pleased with the result.
I tried to get more pictures of the installation, but many of the shots I took were not on the camera when I went to download them. I hope what is here is helpful.